A small retaining wall is built from more than visible blocks: its footing, drainage path, backfill, and the ground it holds all work together. For a low landscape wall on uncomplicated ground, use a matching interlocking block system and follow that system’s installation guide; pause for local review if the wall is tall, loaded, wet, close to a structure, or holding a steep slope.
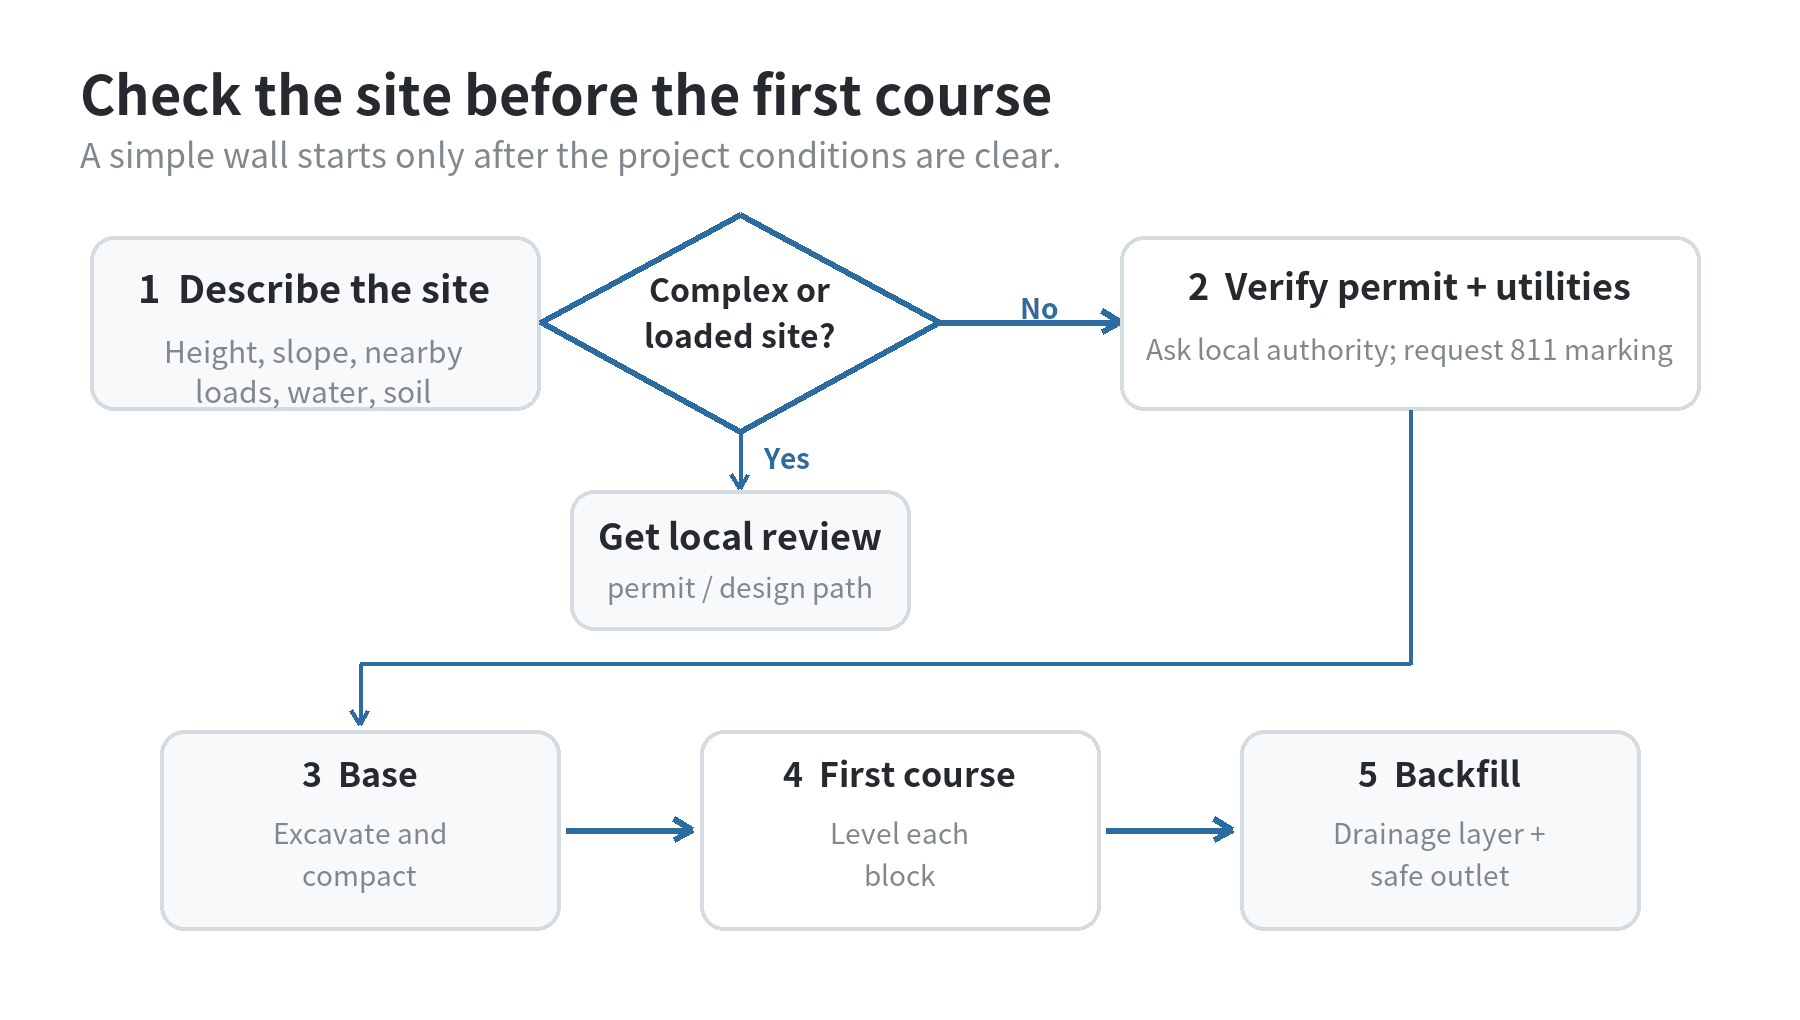
Before laying out the project, check local permit rules and call 811 to have buried utility lines marked. The official retaining-wall guide, checked October 8, 2026, flags both steps and explains a low-wall block method. The instructions below use that as a starting point, with the block manufacturer’s details taking priority for its own system.
Start with the ground the wall must hold
Measure the exposed height from the low side and note what sits behind the wall. A flat planting bed creates a different load from a driveway, shed, fence, or steep rising slope. Allan Block’s retaining-wall guidance, checked October 8, 2026, identifies driveways, patios, and pools as surcharges that may require additional support. Mark where roof runoff, irrigation, and surface water travel after rain. These details affect the wall design; block dimensions by themselves do not answer whether a wall suits the site.
Walk the route and look for signs that the project needs design input: a slope that continues above the wall, water that has no outlet, soft or recently filled ground, a nearby foundation, or a load near the edge. Allan Block’s technical guidance, checked October 8, 2026, ties reinforced-wall construction to design drawings and the engineer’s site-specific decisions. If one of these conditions applies, take a site sketch and measurements to the local building department or a qualified retaining-wall professional before digging.
Permit rules are local. The International Code Council’s 2022 California code, for example, exempts some retaining walls no higher than four feet from a building permit, with stated exceptions; that is a California rule, not a nationwide allowance. Ask the authority having jurisdiction about permits, grading, drainage discharge, and any homeowner-association restrictions.
Match the shopping list to one block system
For a straightforward landscape wall, begin with interlocking retaining-wall blocks that are designed to stack as a system. Read the installation sheet for the exact unit: it defines the base preparation, setback or connection between courses, cap treatment, maximum configuration, and whether reinforcement is part of the design. Do not combine blocks and accessories based only on similar appearance.
Build the materials list from that guide and the site plan. A low-wall project may call for:
- Matching wall blocks and caps, if the system uses them
- Crushed paver base for the compacted footing
- Clean drainage gravel behind the blocks
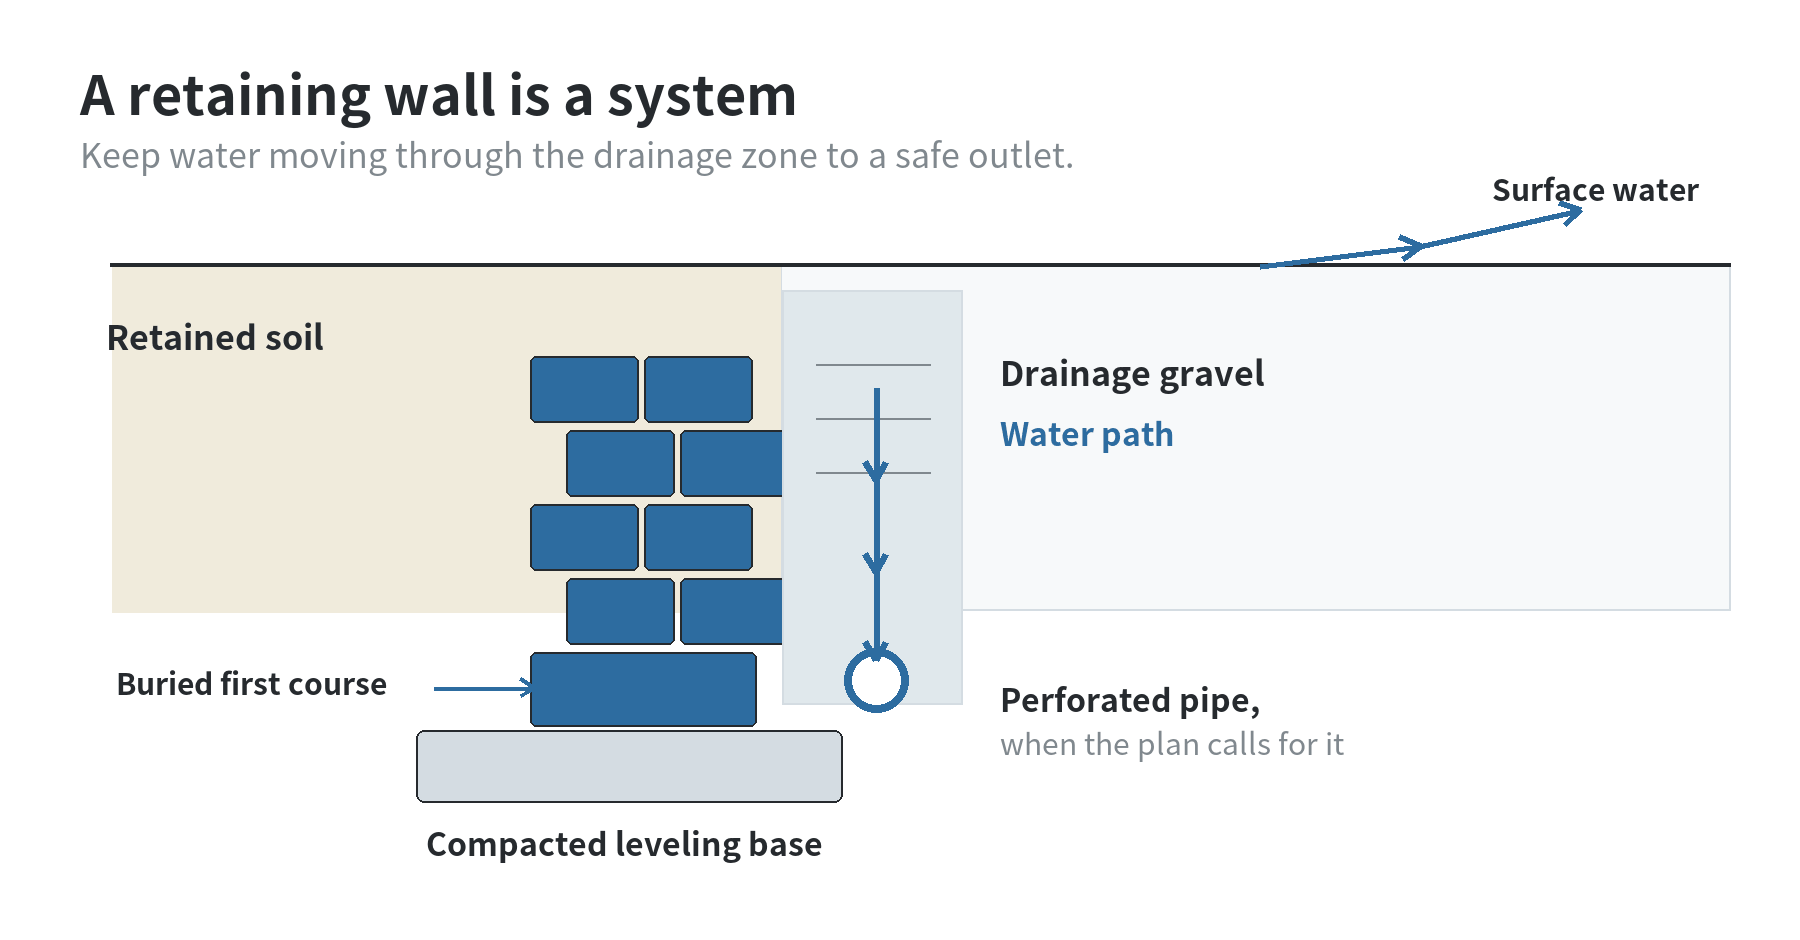
- Perforated drain pipe and a route to a safe outlet, when the plan calls for it
- Landscape fabric where the system specifies separation between soil and aggregate
- Level, mason’s line, stakes, tamper, shovel, and masonry cutting tools
The official low-wall guide lists these kinds of materials as project-dependent; it does not make every item necessary for every wall. Confirm aggregate type, geotextile placement, adhesive use, and cap attachment in the selected block maker’s instructions. Keep receipts and product labels with the plan so the material names and installation details stay together.
Lay out the wall and estimate blocks
Sketch the wall from above and mark its ends, curves, corners, steps, and drainage outlet. Measure each straight run. For a basic estimate, divide each run’s length by the face length of one block to estimate blocks per course, then divide the planned exposed height by the block’s installed course height. Multiply the results and add the extra units required by the guide for cuts and breakage. Curves, corners, buried base blocks, and stepped sections change the count, so do not order from a single length-and-height calculation alone.
Use stakes and mason’s line to mark the face and finished top. If the yard slopes, plan level wall sections that step up or down; do not tilt the top course to follow the grade unless the block maker’s design specifically allows it. Before excavation, request utility marking through 811 and wait for the marks and instructions required in your state.
Build a level base before stacking
Excavate a trench along the line. The official low-wall guide’s example calls for a trench deep enough to bury at least half the first course plus three inches of paver base, and about twice a block wide; the actual dimensions must match your block instructions and site. Remove loose organic material, keep the base trench consistent, then compact the exposed soil if the plan and soil conditions allow.
Add the specified paver base in lifts and compact each layer. Check the base both along the wall and from front to back. Correct high and low spots in the base material before setting blocks; do not rely on later courses to hide an uneven first course. Where the yard rises, make a level step in the base and begin the next section at the elevation required by the block guide.
Set the first course into the compacted base, beginning at the lowest end of a stepped layout. Check every unit for level and alignment, tapping it into position with a rubber mallet. This course controls the line above it, so stop and correct a shift before moving on. Brush off the block faces before stacking so grit does not hold courses apart.
Stack courses and manage water behind them
Place upper courses in the pattern specified for the blocks, with vertical joints offset when the system instructions call for it. Cut units only with a tool and method suited to masonry, using eye, hearing, and dust protection. Install cap blocks or landscape adhesive only if the system instructions call for them. Keep the wall face aligned as you work rather than correcting a lean at the top.
Drainage is part of the wall, not a finishing detail. The official low-wall guide explains that wet soil pushes harder against the wall and identifies gravel or sand backfill, with a perforated drain line for some wetter or higher-wall conditions. Allan Block’s technical guide also specifies free-draining granular material and directs installers to the project design. Use the drainage aggregate and filter fabric arrangement named by the selected system; do not wrap or block an outlet in a way that traps water.
Where the plan includes perforated pipe, place it at the specified elevation and give it a continuous outlet that does not send water onto a neighbor’s property, a walkway, or the wall’s toe. Backfill with the specified material in shallow layers and compact with equipment and lift depths named in the block instructions. Allan Block’s basic installation guide, checked October 8, 2026, sets out a course-by-course backfill and compaction sequence for its own system. Finish the upper soil so surface water runs to the planned drainage area rather than collecting behind the cap.
Know when a DIY plan should stop
A block guide cannot account for every soil profile, water condition, adjacent building, vehicle load, or slope. Stop before excavation if the wall supports a structure or driveway, stands near a property boundary, sits above a steep slope, or needs reinforcement that is not covered by a simple prescriptive detail. Ask the local building department what documents and permits apply, then use a qualified designer or installer where the site needs calculations.
For a small garden edge on stable, level ground, a manufacturer’s low-wall instructions can provide a clear scope. If the layout grows, the grade changes, or drainage has no clear outlet, revise the project before purchasing. The wall’s visible height is only one part of its design.
If your next task is another yard project, the site’s planter-box materials guide covers a separate raised-bed build, while its patio paver guide discusses preparing a walking surface. Those projects do not replace retaining-wall instructions where soil is being held back.
FAQ
Can I build a retaining wall beside a driveway?
Get the wall reviewed before choosing blocks. A driveway adds load near the retained soil, and the design must account for that surcharge; a low-wall landscaping diagram may not cover it.
Does every retaining wall need a drain pipe?
No. The drainage plan depends on soil, water exposure, wall system, and outlet conditions. Use the block maker’s instructions and site design to determine whether gravel alone is specified or a drain pipe is needed.
Can I use leftover patio pavers for the first course?
Only if the manufacturer identifies those exact units as compatible retaining-wall blocks for the planned configuration. Surface pavers and wall blocks serve different roles even when their dimensions look similar.
What should I ask the building department?
Ask whether your wall needs a building or grading permit, what height and surcharge rules apply, whether plans are required, and where drainage may discharge. Give them the wall height, slope, nearby structures, and any load planned above it.
Last updated: 2026-10