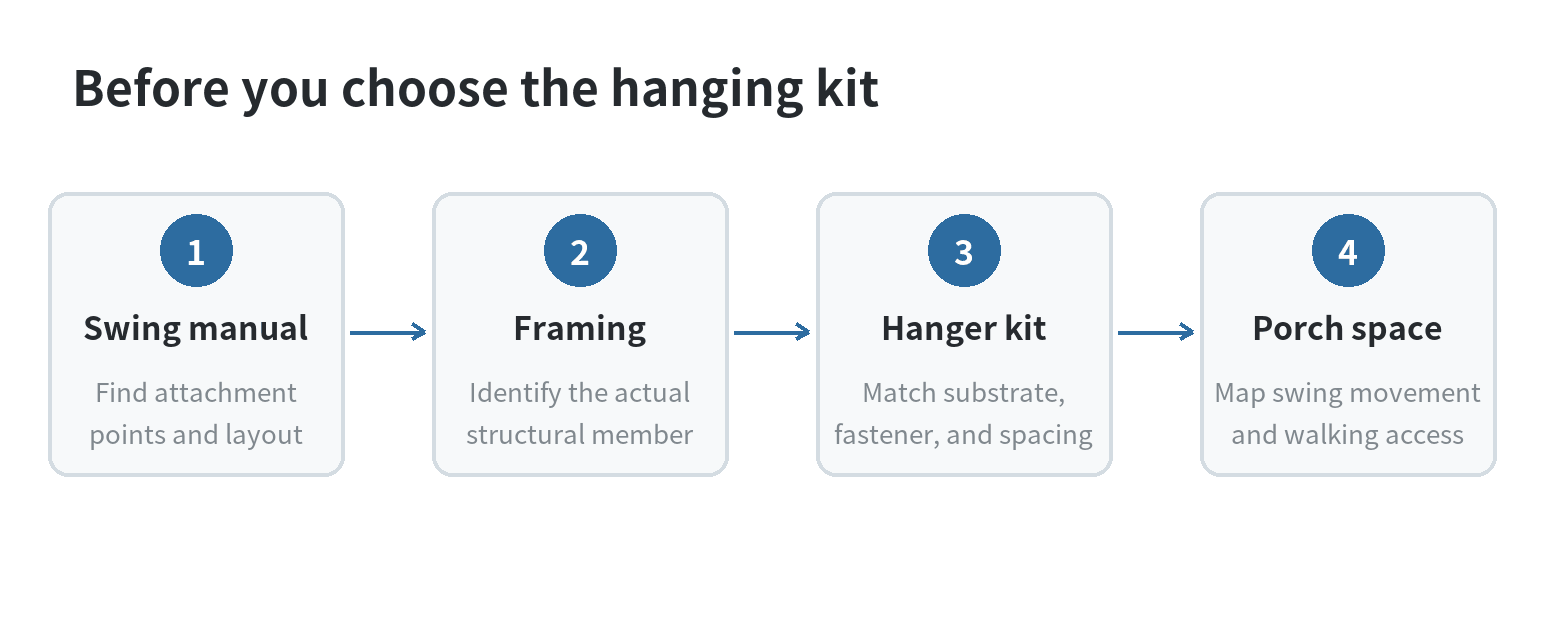
A porch swing hanging kit is only one part of a safe installation: the overhead framing, fasteners, swing, and clear space all have to work together. Start with the swing and hanger instructions, then confirm that the proposed attachment point is actual structural framing. If you cannot identify the framing or its condition, have a qualified carpenter or structural professional assess it before installation.
The key distinction is between a kit’s capacity and the capacity of your porch. A hanger rating does not establish what a ceiling joist can carry, and a joist that looks substantial from below is not enough information to choose hardware. The American Wood Council explains that wood framing capacity depends on factors such as member size, species, grade, span, and loading. A swing adds a repeated, moving load, so do not treat a generic kit rating as approval for an unknown ceiling.
Match the kit to the swing and the framing
Before comparing hanging kits, find the swing’s installation manual and write down its attachment layout. Note whether the swing uses two or four attachment points, the spacing between them, the chain or rope arrangement, and any required fastener type. The manual’s geometry matters: a kit with a different attachment pattern may pull at the wrong points even if its package lists a large capacity.
Next, identify what the instructions mean by a support. Some manuals call for a beam or joist; a porch-swing installation manual says to attach to porch framing rather than only to soffit or ceiling boards. Those finish boards are not a substitute for the structural member named in the instructions.
Use the kit instructions to check the substrate, fastener, pilot-hole size, embedment, spacing, and installation direction. Do not swap a lag screw for a through-bolt, or choose a longer screw by guesswork. A change in fastener type or location changes the connection. If the kit’s instructions do not clearly cover your framing type, ask its manufacturer or a qualified professional before drilling.
| Check | What to compare | Why it matters |
|---|---|---|
| Swing layout | Number and spacing of attachment points | The chains must meet the swing’s intended connection geometry. |
| Hanger kit | Approved framing, fasteners, drilling, and spacing | Instructions define how that specific connector is installed. |
| Overhead structure | Member type, condition, and attachment location | The framing must carry the added load through its existing connections. |
| Clearance | Seat movement, nearby walls, rails, doors, and walking paths | The swing needs room to move without striking an obstruction. |
Why a ceiling joist cannot be judged by appearance
Two pieces of lumber with the same visible depth can perform differently. The American Wood Council’s span-table tutorial describes how species, grade, member dimensions, spacing, span, and loading affect strength and stiffness. From below, a finish board may not reveal which structural member is behind it.
That is why “find a joist and screw into it” is not a complete structural check. You need to know that the member is the right kind of framing, that it is in sound condition, and that the proposed connection fits the framing and its load path. The load path is the route from the swing through the connector and framing to the supports. A strong hanger cannot compensate for weak or damaged framing above it.
Look for visible warning signs such as cracking, splitting, sagging, water damage, or a member that moves when touched. These signs do not diagnose the structure; they are reasons to stop and seek an assessment. Concealed damage may not be visible from below. If you are unsure what sits above the ceiling finish, do not use a stud finder reading alone as a structural approval.
Several porch-swing installation manuals direct readers to consult a carpenter or contractor when support strength or joist location is uncertain. A professional can identify the framing, inspect its condition, and determine whether reinforcement or a different location is needed. Ask them to assess the full connection rather than only the hanger part number.
Plan swing clearance from its actual movement
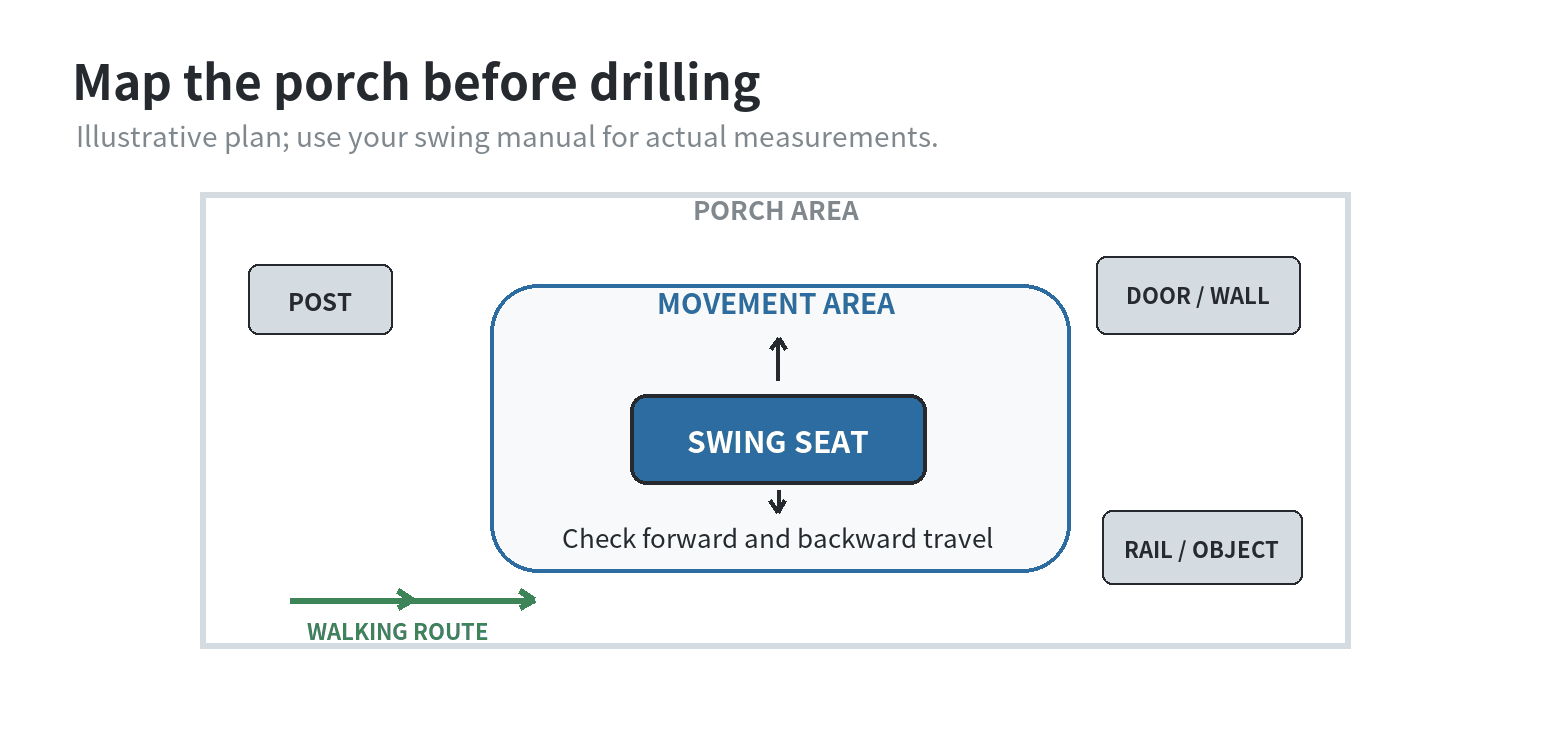
Clearance depends on the swing’s size, chain angle, hanging height, and the space around it. Manuals for different swings give different spacing examples, so a single distance should not be treated as a rule for every porch. Follow the instructions for your model and map the seat’s movement before making holes.
Mark the swing’s footprint on the floor with painter’s tape. Add the space it needs to move forward and backward, then check the sides as well. Include posts, railings, walls, doors, stairs, planters, grills, lights, and the route people use to cross the porch. Check that chains will not rub against a wall or rail and that a person can approach the seat without stepping into its path.
A simple example: if your swing is centered under a beam but its seat would approach a door when it moves, shifting the swing may solve the clearance problem only if the new attachment points still land on suitable framing. Do not offset one hanger to avoid an obstruction unless the swing and hanger instructions allow that arrangement. If the required spacing and a usable movement area cannot both fit, choose another location or a different swing configuration.
A careful layout before the first pilot hole
Measure the swing’s specified hanger spacing, then locate framing that can accept the complete pattern. A common snag is that the swing’s attachment points do not line up with the framing. Do not bridge between joists with a scrap board or relocate one fastener without an engineered or manufacturer-approved detail. The American Wood Council’s guidance shows why member span and support conditions are part of structural sizing, not just the visible point where a screw enters wood.
Once framing and location are confirmed, transfer the dimensions from the product manual to the actual porch. Check each mark against the swing width, chain direction, and surrounding clearance. Then compare the planned holes with the hanger instructions for edge distance, pilot-hole diameter, and drilling depth. If you cannot access the framing well enough to verify the hole location, pause and arrange professional installation.
Do not drill into a truss, engineered I-joist, laminated member, or other engineered framing unless the product instructions specifically allow the connection or a qualified professional provides a suitable detail. These members are designed as systems, and an unapproved hole or load can affect their performance. The American Wood Council treats wood framing as a system whose strength and stiffness depend on member properties and support conditions; the exact member type therefore matters.
What to verify when choosing a hanging kit
Use the table below to compare instructions, not package claims in isolation. Save the manual for both the swing and the kit so you can check that they describe a compatible installation. If the documents conflict or omit your framing condition, send the exact model information to the manufacturer or show it to the professional reviewing the structure.
| Question | What a usable answer looks like |
|---|---|
| Is the kit made for the identified framing? | Instructions name the applicable wood member or support type. |
| Does its layout match the swing? | Point count, spacing, and connector orientation align with the swing manual. |
| Are installation details complete? | Fastener type, hole preparation, spacing, and tightening steps are specified. |
| Can the full swing move freely? | The movement area and access route avoid the porch’s fixed obstacles. |
| Is the structure uncertain or damaged? | A qualified professional evaluates it before the kit is installed. |
Keep the product labels, manuals, and any professional assessment together. This makes it easier to answer questions about a replacement chain or connector later. If a part is missing, bent, corroded, or different from the installation instructions, stop using that connection until the correct part and installation method are confirmed.
For related project planning, see the site’s overview of basic homeowner tools and its first-home project checklist. They cover general preparation; the swing and hanger manuals still determine the installation details.
FAQ
Can a porch swing and a ceiling fan share the same porch area?
Only if the swing’s full movement stays clear of the fan. Treat its blades, housing, and controls as fixed obstructions when mapping the swing path.
Can two porch swings hang from one overhead beam?
Do not assume one beam can support both swings. Have a qualified professional review the combined load, hanger locations, and beam supports before adding the second swing.
Can I reuse the same hanging kit after moving a porch swing?
Reuse it only if the kit instructions permit the new framing and layout and the parts remain in the condition required by the manual. Confirm the new holes and attachment points before rehanging.
What if my swing and hanger kit manuals specify different spacing?
Do not average the measurements or choose one by guesswork. Ask both manufacturers or a qualified installer how the two products work together before drilling.
Can a swing go under a porch ceiling with visible boards but no exposed joists?
Yes, only when the actual framing and approved connection are identified. If the boards hide the framing or its condition, ask a qualified professional to locate and assess the support.