Choose a heated snow mat by the shape of the patch you need to clear: a short tread for an individual step, a longer strip for a narrow path, or a wide panel for an entry or ramp. Measure the usable surface first, then check the exact model’s voltage, current draw, and GFCI instructions. The sizes sold through major retail listings range from compact stair pieces to driveway-length mats, so a product label matters more than the category name.
Match the mat shape to the surface
A stair mat is a long, narrow rectangle intended to sit on a tread. A walkway mat is wider and covers a section of level path. A driveway or ramp mat is a long strip that follows a tire track or travel lane. The names are useful starting points; the measured dimensions tell you whether a model will actually fit.
Current product listings show examples such as a 10-by-30-inch stair-sized piece, a 20-by-60-inch walkway mat, a 30-by-30-inch square, and driveway strips sold in 24-inch-by-10-foot dimensions. These are examples of listed formats, not fixed industry standards. HeatTrak’s own stair specifications also show 10-inch widths with 30-, 48-, and 60-inch lengths.
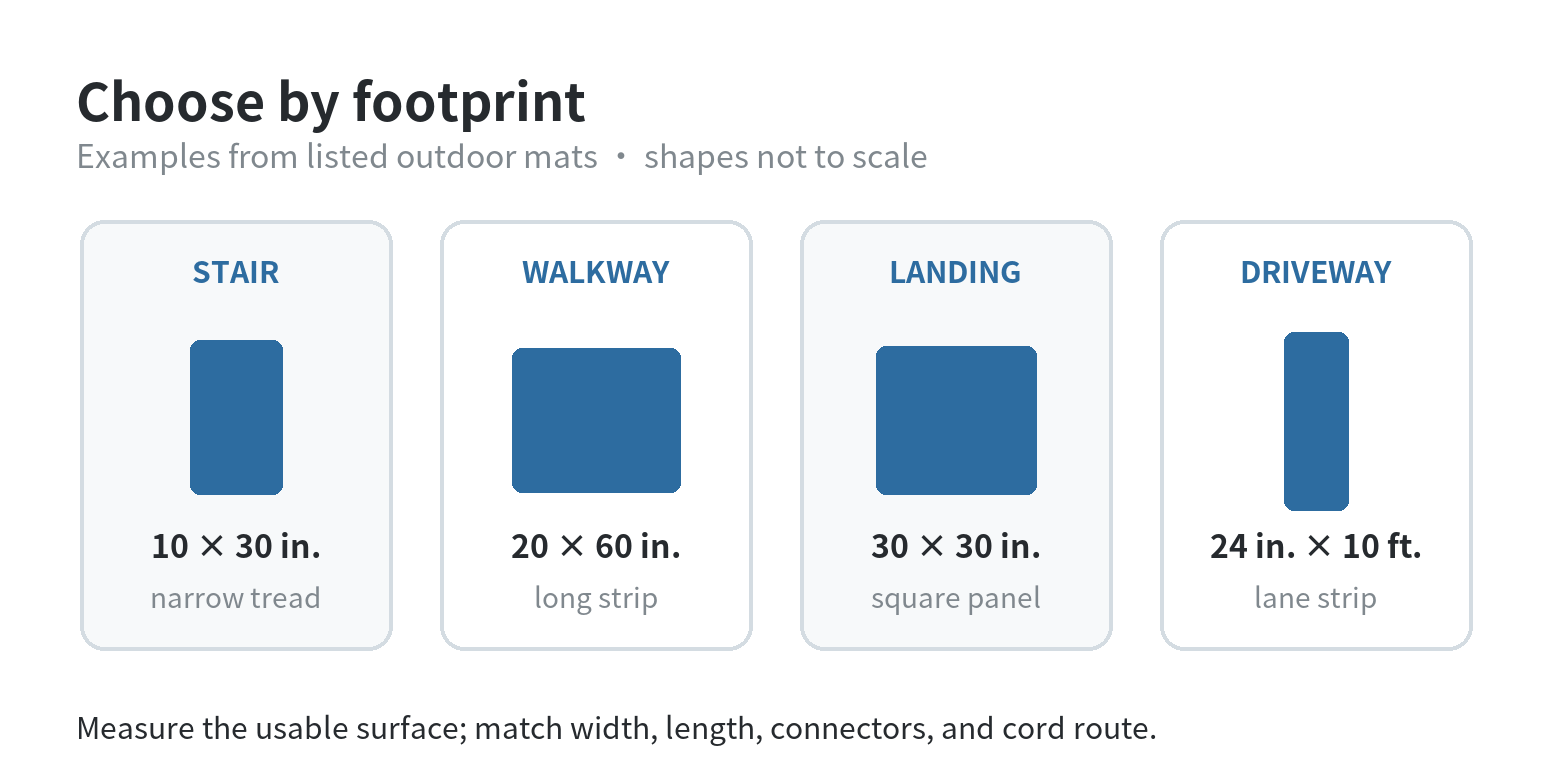
| Area | Example listed size | Measure before choosing |
|---|---|---|
| One stair tread | 10 × 30 in. | Tread width and front-to-back depth |
| Walkway section | 20 × 60 in. | Path width and the length of each covered section |
| Entry or landing | 30 × 30 in. | Clear landing width and door swing |
| Driveway lane or ramp | 24 in. × 10 ft. | Lane length, tire path, and room for the cord |
Product dimensions and use descriptions come from current listings for heated outdoor mats and their manufacturers’ specifications. A 30-by-30-inch square covers a different footprint from a 20-by-60-inch strip even though both have a similar general purpose. Make a paper outline or mark the area with painter’s tape before selecting a format; leave the walking surface and door clearance visible in your layout.
Count steps and path sections before you choose
For stairs, count every tread you intend to cover and measure each one. A 10-by-30-inch mat is a useful size to compare with a compact tread; a 48- or 60-inch length is designed for a longer stair surface or a different product layout. Do not assume one mat can be folded or trimmed to fit. The HeatTrak stair instructions say not to cut or alter the mat, and its product specifications treat each size as a separate model.
Measure tread width across the step and depth from the riser toward the front edge. The width tells you whether a narrow mat will leave a side gap; the depth shows whether the mat can lie flat without projecting over the edge. If the stairs turn or widen at a landing, note that as a separate area instead of counting it as another tread. A multi-piece pack also needs an item count that matches the number of steps you plan to cover.
For a straight path, divide the route into sections that match the mat length. As a planning example, a 12-foot route can be sketched as two 6-foot zones or several shorter zones, but the chosen mat system must allow those pieces to connect. Check connector locations, cable direction, and whether the maker permits the exact combination. A diagram on paper helps reveal gaps near a step or doorway before cords are connected.
Measure the narrowest point of a walkway, not just the open stretch beside the house. A gate, downspout, porch post, or inward-swinging door can reduce the available width. If the path is wider than one mat, compare a wider model with a side-by-side layout only when the manufacturer permits that connection. Keep the sketch clear about where each mat ends so a short final section does not get mistaken for full-path coverage.
For a driveway, first decide whether the goal is a narrow track where tires pass or a broader walking approach. A 24-inch-wide, 10-foot-long format is a strip, not a full-width driveway covering. Measure both tire paths and the space between them; the resulting layout may call for separate lanes. Do not plan to overlap mats unless the model’s instructions expressly allow it.
Record one length for each tire track and mark where the vehicle turns or parks. A straight lane and the space in front of a garage door may need different shapes. If the proposed layout uses multiple mats, compare the pack quantity with the number of pieces shown on your sketch, then verify that the cords can reach the intended outlet without crossing a doorway or walking route.
Use the table as a measuring worksheet
Record dimensions in inches, then compare them with the item’s listed length and width. For an irregular space, break the area into rectangles rather than estimating one large size. The example below uses sample measurements only; replace them with your own.
| Sample spot | Measured space | What to compare |
|---|---|---|
| Front step | 11 in. wide × 31 in. deep | Mat width and the amount of uncovered tread |
| Side path | 22 in. wide × 11 ft. long | Mat width, connected length, and end gaps |
| Garage approach | Two 24-in. tire tracks, each 10 ft. long | Whether each strip fits and how many circuits the layout needs |
These sample dimensions are arithmetic examples, not reported product measurements. Use the item’s stated dimensions to see whether its edges fit inside your marked area. If a mat would project into a doorway, leave an exposed step edge, or put a connector underfoot, revise the layout before checking electrical capacity.
For a rectangular space, compare both dimensions instead of looking at square footage alone. A long narrow path and a square landing can have a similar area but need different mat shapes. Lay out the outline on paper, mark the direction of travel, and write the product dimensions next to each piece. This simple drawing also makes it easier to spot a short uncovered gap at a threshold or between the last mat and the sidewalk.
Check power and GFCI for the exact model
Do not choose a mat based on another model’s plug or electrical rating. One listed 30-by-30-inch mat specifies 120 volts and 3.6 amps with a GFCI plug; HeatTrak’s residential instructions describe a GFCI power unit for its system, while its stair manual calls for a properly grounded outdoor outlet and checking the GFCI. A separate heated mat manual specifies a different current draw. Those differences are why the label and manual for the exact item should control.
Before planning connected mats, add the current draw printed for each piece and compare the total with the product’s connection limit and the circuit rating. The manufacturer may require its own power unit, connector, or outdoor-rated extension cord. Keep plugs and connection points as the manual directs, and do not alter a plug or safety device. If the outlet, circuit, or GFCI arrangement is unclear, ask a qualified electrician to review it before use.
Look at what comes in the package as carefully as the mat count. Some systems describe a separate GFCI power unit, while other product listings show a GFCI plug included with an individual mat. The included device, plug shape, cord length, and allowable number of connected pieces are model-specific. A mat with the right footprint can still be a poor layout fit if its cord cannot reach the outlet or its connectors cannot join the next piece.

Finish the layout without confusing mat types
Heated mats are portable surface products. They are different from embedded snow-melting systems and from heat cable, which is arranged along an edge or inside a specified assembly. For other winter equipment, see the snow and ice supplies overview; for roof-edge systems, see the guide to ice-dam prevention supplies.
Before settling on a size, confirm three things on the item page and in the manual: its actual dimensions, whether the maker lists it for the surface you measured, and the electrical limits for the full connected arrangement. Compare any bundle by counting individual mats and checking whether a power unit is included. This keeps a stair tread, walkway strip, square landing mat, and driveway lane from being treated as interchangeable shapes.
FAQ
Can I overlap two heated snow mats to cover a wider path?
Only if the exact product manual allows overlapping. Check its placement and connection instructions; if it does not say that overlap is allowed, lay separate mats side by side with the clearances the manufacturer specifies.
How do I size mats for a curved walkway?
Break the curve into short straight sections and compare each section with the listed mat shape. A rigid rectangle may leave uncovered wedges on a curve, so sketch the outline and verify that connectors and cords can stay outside the walking line.
Can a stair mat continue onto a walkway?
Some systems are designed to connect stair and walkway mats, but connector type and electrical capacity vary. The manufacturer’s product page or manual should name compatible pieces and any required connector or power unit.