Choose a storm door by deciding how you want to use the entry first: keep glass in place, swap glass for a screen,
or lower a built-in screen when you want airflow.
Then measure the exterior opening at several points and use the smallest width and height that the door maker specifies.
A door’s nominal size is not a substitute for checking the trim, sill, handle clearance, and handing.
Start with the way you want to use the entry
Choose the panel routine that fits the household.
If you expect to change between glass and screen, consider whether you have a safe, convenient place for a loose panel.
For a retractable design, check the guide for how the screen is extended, retracted, and cleaned.
A demonstration can help you judge whether the motion is comfortable for the people who will use it.
A storm door sits outside the main entry door.
The useful differences are how much glass it has, how its screen works, and how the panel is managed between seasons.
Product names vary, so compare the function described in the model’s installation guide rather than relying on a label alone.
| Configuration | How it works | What to consider |
|---|---|---|
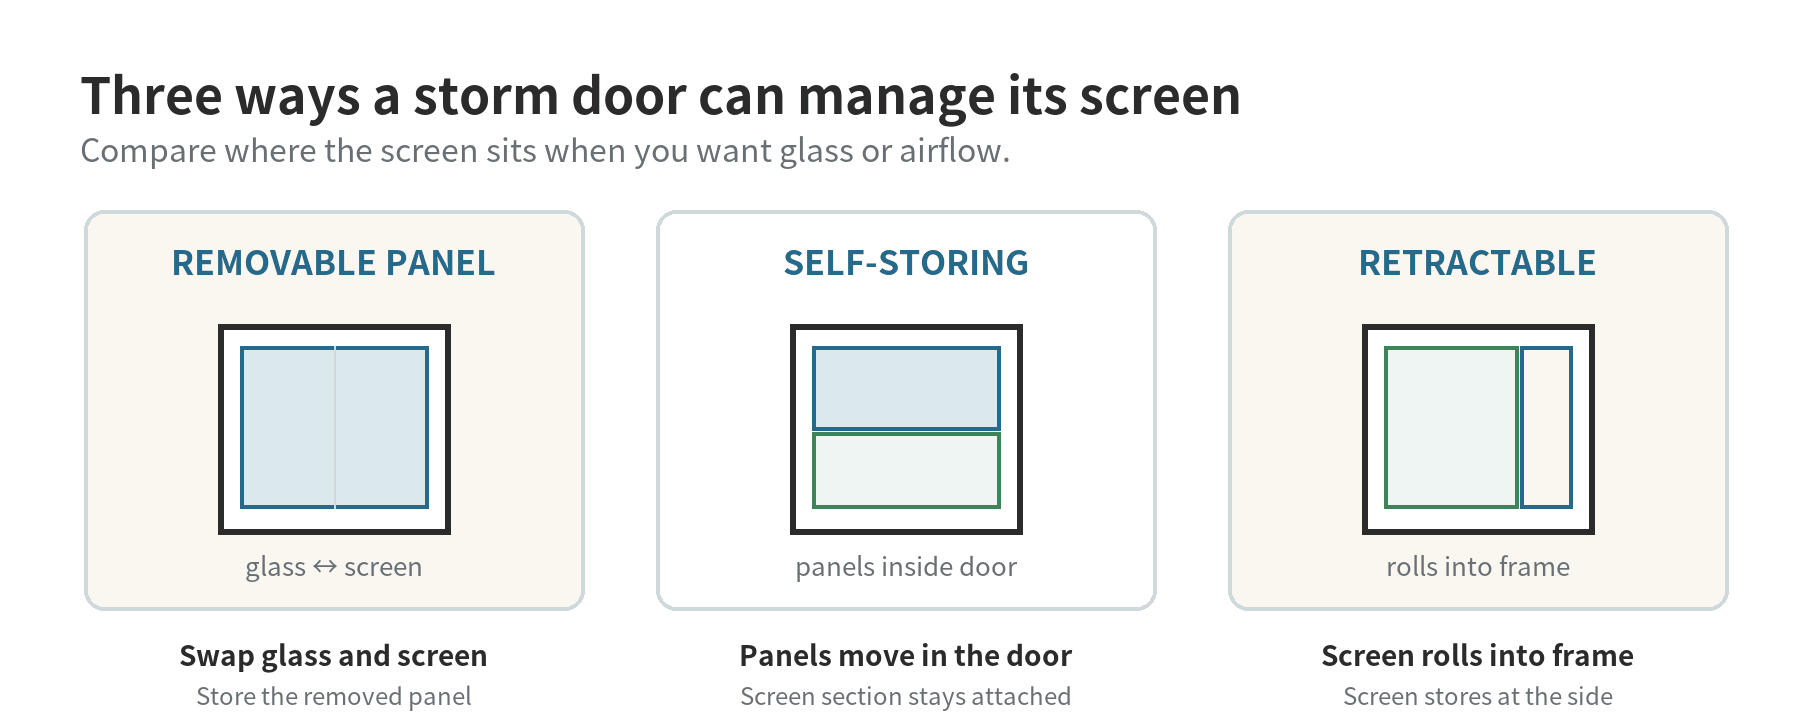
| Full-view glass with a removable screen | A large glass panel is exchanged for a screen panel when you want airflow. | Plan where the removed panel will be stored and how often you want to change it. |
| Self-storing glass and screen | Glass panels move within the door so a screen section can be exposed. | Check how much screen area opens and whether the controls are comfortable to reach. |
| Retractable screen | The screen rolls into the door frame when it is not in use. | Ask how the screen is operated and how it is serviced if it becomes damaged. |
| Ventilating panel | A section opens while the remaining door structure stays in place. | Compare the opening area with your airflow needs and the location of the main door. |
Manufacturer product guides describe these different approaches: a full-view door can use a replaceable screen panel,
while retractable-screen designs store the screen in the frame.
That describes panel operation, not a guaranteed amount of ventilation.
Air movement depends on the open area, wind, and other openings in the home.
Measure the opening, not the old door slab
Keep the tape level across the opening for width readings and use the same inside trim faces each time.
Write each result beside its location instead of relying on memory.
Look at the full mounting area before deciding the opening is ready.
Note loose trim, gaps, repairs, or surfaces that are not in the same plane, because the frame needs a suitable place to attach.
Get a tape measure, pencil, and a note sheet.
Measure the clear opening inside the exterior trim where the storm door frame will sit.
Do not copy the width printed on an old door; the opening and mounting trim determine fit.
- Check the mounting surface. Look for a flat, sound surface on both sides and across the top. The storm-door installation guide specifies minimum trim width and depth for that installation system and notes that the entry handle may need extra clearance. Treat those dimensions as model-specific requirements, not as universal rules.
- Take three width readings. Measure between the inside faces of the exterior trim near the top, at the center, and near the bottom. Write down each reading, then circle the narrowest one. A frame that is slightly out of square can give three different readings.
- Take height readings. Measure from the sill to the underside of the top trim at the left, center, and right. Record the shortest height if the chosen manufacturer’s guide calls for it. Check that the sill is solid and note whether it slopes.
- Record obstacles and handing. Note the main door’s handle, deadbolt, light fixtures, railings, and any uneven trim. Stand outside facing the entry and decide which side should carry the storm door hinges based on how the main entry and approach are used; verify the model’s handing diagram before selecting.
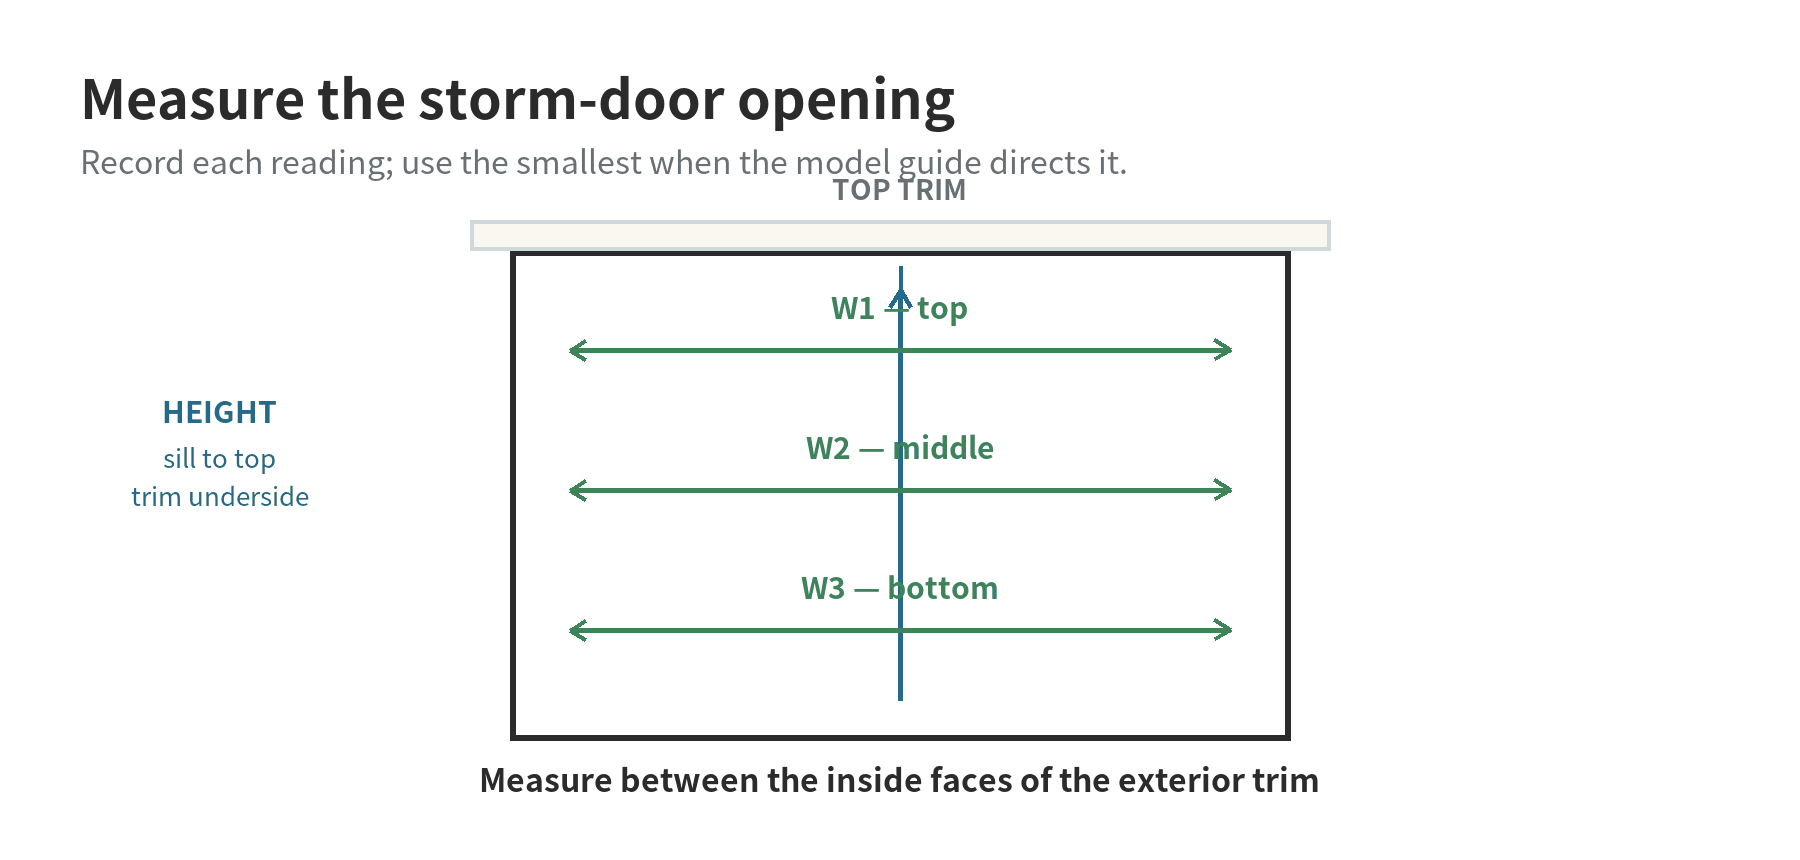
The storm-door measurement guide calls for width readings at the top, center, and bottom, using the shortest width,
and measures height from the sill to the underside of the top trim.
It also lists clearance needs for the trim and jamb.
Another maker may define the measurement points differently,
so compare your notes with the fitting chart and instructions for the exact door you are considering.
Use the smallest reading to check fit
Keep the original readings even after identifying the shortest one.
The full set shows whether the opening changes gradually or whether a single location creates the tightest point.
When a reading is close to a chart boundary, take it again and check that the tape is seated at the same trim edge.
If the repeat differs, keep both notes and ask which measurement point the model guide uses.
Suppose your example opening measures 35 7/8 inches at the top, 35 3/4 inches in the middle, and 35 5/8 inches at the bottom.
Your width note is 35 5/8 inches, not the average.
If the heights are 80 1/2, 80 3/8, and 80 1/4 inches, note the shortest height too.
These are sample readings, not a standard door size or a promise that a particular model fits.
Next, compare those numbers to the manufacturer’s opening-size chart.
Confirm that the trim is wide enough for the mounting rail, that the jamb has the required depth,
and that the main door handle will clear the storm-door frame.
If a dimension falls outside the listed range, pause and ask the manufacturer or an installer whether a different frame, extension,
or custom size is appropriate.
Do not trim or alter a door based only on a general measurement article.
Take a photo straight on and one from the hinge side if you are asking someone to review the opening.
Include the written readings and show the sill and trim.
A photo can help explain an obstruction,
but it cannot replace the model’s measurement chart or an on-site assessment where the mounting surface is damaged or irregular.
Match ventilation to how the doorway is used
Think through the route into and out of the home with both doors in their intended positions.
Note whether the storm door would meet a step, railing, wall, or another door as it opens.
If the main door is used for deliveries or carrying larger items, check the opening path in person.
The screen type is only one part of the choice; the frame and handles also occupy space around the doorway.
Screen operation determines the routine.
A removable panel means storing and changing a panel; a self-storing design keeps the components in the door;
a retractable design rolls the screen away when unused.
Before choosing, picture the ordinary task: opening the main door for a breeze, carrying items through the entry,
or keeping the glass closed while still exposing a screen.
Consider the main entry door, too.
If it swings outward, the storm door’s swing and handle need to clear it.
If the main door is often left open behind the storm door,
check that the screen can remain open safely and that the closer or hold-open hardware suits the location.
Keep the intended path clear of steps, railings, and furniture.
A screen creates an opening for outdoor air only when the main entry is open and other conditions allow air to move through the home.
It does not provide mechanical ventilation, and an open screen does not control outdoor temperature, smoke, insects entering through other gaps,
or security by itself.
Think of it as an entry-door configuration, not a substitute for a dedicated ventilation system.
Bring these notes to the model guide
Use the same checklist for each candidate: opening range, trim and jamb requirements, handle clearance, handing, panel operation,
and maintenance instructions.
A side-by-side note helps reveal which questions are still unanswered.
When a chart does not cover the condition you measured, share the specific reading and a photo with the manufacturer or installer.
Ask for guidance on that opening before ordering or altering a frame.
Before selecting a door, have the three width readings, three height readings, photos of the sill and trim,
and notes about the handle and hinge preference together.
Then check the exact installation guide for compatible opening ranges, included frame parts, screen operation, handing,
and any clearance requirements.
A few minutes spent matching those details can prevent ordering a door that cannot mount cleanly.
Frequently Asked Questions
Can a storm door fit if the opening is not perfectly square?
It depends on the specific frame’s adjustment range and the mounting surface.
Compare the narrowest width and height with that model’s chart, then ask the manufacturer or installer about a visibly out-of-square opening.
Should I measure an installed storm door or the opening behind it?
Measure the opening where the replacement frame will mount, following the new door’s guide.
The old slab’s size may not match the mounting opening.
Which storm-door screen is easiest to store?
A retractable screen stays within the frame when not in use, while a removable full-view screen panel needs a separate storage spot.
Check the manufacturer’s operating instructions for the specific model.
Does opening a storm-door screen ventilate every room?
No.
It creates an opening at the entry; air movement through the home also depends on other openings and conditions.
A screen door is not a mechanical ventilation system.