Thousands of People Were Struggling With Money Until They Discovered This One Ancient Secret Hidden in Sound
>>> Unlock It Now <<<

Moving to a new iPhone should feel exciting, not stressful. This guide covers the three official ways to move your data safely and quickly: Quick Start, iCloud backup and restore, and computer backup. You’ll get a simple, step by step path that works whether you’re upgrading to the latest model or switching devices.
If you’re pressed for time, Quick Start is the fastest option when both phones are ready. For a hands off approach, iCloud backup and restore lets you move your data over the air and keep your phone camera ready for use. If you have a lot of data or want a local copy, backing up to a computer gives you full control and an offline backup.
A small tip to keep your move smooth: keep both devices on Wi Fi and fully charged. That helps prevent interruptions and protects your data during the transition. No matter which method you choose, your apps, photos, messages, and settings will land on your new iPhone intact.
Quick Start: Transfer data to your new iPhone in minutes
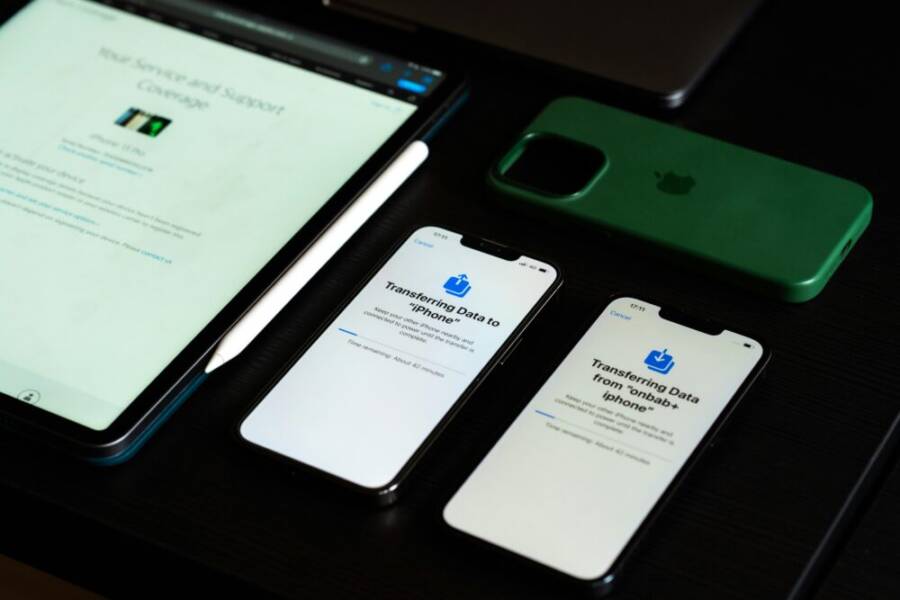
When timing matters, Quick Start gets your new iPhone up to speed fast. This method uses a proximity connection between your old and new devices to copy most of your data during the setup process. Both phones need to be on iOS 12.4 or later, and a stable Wi‑Fi and Bluetooth connection helps the transfer run smoothly. You’ll move apps, settings, photos and more in one streamlined flow, so your new iPhone looks and feels like your old one from day one.
He Was Drowning in Bills and Burnout Until a Simple Daily Ritual Rewired His Brain for Wealth in Less Than a Week
>>> Start Your Shift Today <<<

 Photo by Sami Abdullah
How Quick Start works
Quick Start uses a near field connection between your two iPhones to establish a secure data transfer. When you start the setup on the new device and bring it close to the old device, you’ll see a prompt on the old iPhone asking to use Quick Start. The process creates a bridge for data to move directly from the old iPhone to the new one. Think of it like a wireless, phone-to-phone handoff that copies nearly everything you’d want on your new device.
- It copies apps, settings, photos, messages, and other data, so your new iPhone mirrors your old one more quickly.
- A strong Wi‑Fi signal and Bluetooth enable a fast, reliable transfer; if the two devices stay connected, you’ll avoid interruptions.
- The transfer happens during the setup flow on the new iPhone, so you don’t need to run a separate backup restore afterward.
To boost reliability, keep both devices charged and don’t initiate other large data tasks during the transfer. If you run into a hiccup, pausing briefly and retrying with both devices still near you often resolves the issue. For official guidance and troubleshooting tips, Apple’s Quick Start article covers what to expect and how to prep your devices.
For more details on the official process, see Apple’s guide: Use Quick Start to transfer data to a new iPhone or iPad.
Steps to use Quick Start
Follow these steps for a smooth, minutes‑long transfer. Each step is designed to keep things simple and clear, so you can stay focused on getting set up.
- On the new iPhone, start setup and place it near the old iPhone.
- The old iPhone shows a prompt to use Quick Start.
- Scan the animation with the old iPhone camera when prompted.
- Follow the onscreen prompts on both devices to begin the transfer.
- Keep both devices near each other and powered until the transfer finishes.
- Complete the setup on the new iPhone and verify that your data has arrived.
During the process, you may see options to transfer certain items like your Apple Watch data or keychain information. If you’re logged into iCloud with the same Apple ID on both devices, some information can transfer more seamlessly. Always review what’s selected for transfer before confirming, so you only move the data you want.
To help you plan, Apple also describes an alternative wired method to transfer data if you want to avoid wireless traffic. See Apple’s wired transfer article for details: Use a wired connection to transfer data to a new iPhone or iPad.
Pros and cons of Quick Start
Here’s a quick snapshot to help you decide if Quick Start fits your move.
She Pressed Play on a Strange Audio Track and Within Days Her Financial Reality Started Shifting in Ways She Could Not Explain
>>> See How It Works <<<

- Pros
- Fast and direct: Transfer happens during setup, so you’re ready to go quickly.
- Wireless: No cables needed for most users.
- Covers most data: Apps, settings, photos, messages, and more come over.
- No post‑setup restore needed: You typically won’t have to run a separate restoration.
- Cons
- Nearby devices required: Both iPhones must stay close during the transfer.
- Can take longer with lots of data: Large photo libraries or many apps can extend the time.
- Requires ready devices: If one phone isn’t charged or connected, the transfer can stall.
If you’d rather not use wireless transfer, you can turn to the iCloud backup path or a computer restore, which Apple describes in its support articles. For context on how Quick Start compares to other options, you can explore Apple’s overview here: Use Quick Start to transfer data to a new iPhone or iPad.
Images and visuals help many readers gauge the setup process. If you want a quick visual reference, consider the above image showing the concept of two devices exchanging data during setup. The same approach also applies to iPad transfers when moving from an iPhone to an iPad or vice versa.
Would you like me to add a short troubleshooting box with common Quick Start issues and fixes, or keep it strictly focused on the step-by-step flow?
iCloud Backup and Restore: Move data over the air
Moving to a new iPhone can be quick and painless when you use iCloud backup and restore. This method lets you move most of your essential data wirelessly, with only a few steps between you and a ready-to-use device. The key idea is simple: back up your old iPhone to iCloud, then restore that backup on your new iPhone during setup. You’ll likely notice that photos, messages, settings, and app data come through, while some items may require you to log in again. Media and other large files can download in the background as you start using your new device.
What the iCloud backup covers
iCloud backups are designed to capture the core pieces of your iPhone experience so you can pick up where you left off. In most cases, you can expect to restore:
- Photos and videos from the Camera Roll plus albums you’ve created
- Messages, iMessage, and SMS content
- Settings for devices, apps, and your system preferences
- App data for the apps you use daily
- Health data and activity information that is enabled for backup
- Your home screen layout and device-specific configurations
Keep in mind that some items may require re-login after restoration, especially apps that store credentials or offer two-factor authentication. Media may download in the background, so your phone might show “Loading” for certain items until they finish syncing. For a more detailed look at which items are included in an iCloud backup, you can review Apple’s guidance on restoring from iCloud backups. You can explore Apple’s official steps here: Restore using iCloud Backup.
Steps to restore on the new iPhone
Restoring from iCloud is a straightforward five-step process. It’s designed to be intuitive so you can get back to daily life quickly.
- Backup your old iPhone to iCloud.
- Turn on the new iPhone and begin the setup process.
- Choose the option to Restore from iCloud Backup.
- Sign in with your Apple ID and pick the latest backup.
- Let the restore finish; apps will download in the background as needed.
During setup you might see options to restore particular data like Apple Watch information or keychain data. If you use the same Apple ID on both devices, some items transfer more smoothly. Always review what’s selected for restore before confirming to avoid pulling over items you don’t want.
If you prefer a guided walkthrough or need a wired alternative, Apple also covers related methods. For a direct official guide on starting with iCloud, see: Use iCloud to transfer data from your previous iOS or iPhone.
Pros and cons of iCloud restore
Choosing iCloud restore brings a wireless and hands-off setup, but it also has trade-offs. Here’s a concise view to help you decide.
- Pros
- Wireless setup: No cables, no computer required.
- Simple and fast start: Start the transfer as you set up the new device.
- Covers most essential data: Photos, messages, apps, settings, and more move over.
- Cons
- Depends on internet quality and speed: A slow connection can extend the restore time.
- iCloud storage limits: Free plans may require buying more storage for large backups.
- Background downloads can take time: Large libraries and apps may finish syncing after you start using the phone.
If you anticipate a large amount of data or want a local copy for added control, you can also back up to a computer. Apple’s official guidance on restoring from a backup on your iPhone provides a complementary path if you ever want to do things offline: Restore your iPhone, iPad, or iPod touch from a backup.
To make sure you have a smooth experience, keep both devices connected to Wi-Fi and plugged in during the process. If you run into hiccups, a quick retry from your old phone can reestablish the backup and speed up the restoration on the new device.
Links to official resources and step-by-step instructions can help when you need a quick refresher. For a broader overview that compares Quick Start, iCloud restore, and computer restore, Apple’s guide is a reliable companion: Transfer data from your previous iOS or iPadOS device to a new device.
What If the Only Thing Between You and the Life You Deserve Is a Hidden Wealth Code Waiting to Be Activated
>>> Open the Door <<<

Would you like practical tips on optimizing iCloud backups, such as managing storage space or choosing what to back up to minimize restore times? I can add a quick checklist to your article if you’d like.
Computer Backup and Restore: Offline transfer using a computer
Transferring data offline with a computer gives you a local, private copy of your iPhone data. It’s reliable for large libraries, passwords that are stored securely, and health data. If you prefer having a physical backup on your desk rather than relying on the cloud, this method is for you. Below you’ll find exactly what you need, the steps to perform the backup and restore, and the main pros and cons to help you decide if this is the right path for your smartphone setup.
What you need for computer backup
To back up to a computer, gather a few essentials. You’ll want a PC or Mac, a USB cable, and the right software depending on your operating system:
- A PC or Mac with the latest version of iTunes (Windows or older macOS) or Finder (macOS Catalina and later). Finder on newer Macs handles iPhone backups directly.
- A USB cable to connect the iPhone to your computer. A reliable cable reduces the chance of interruptions during the backup process.
- An encrypted backup option. Encrypting the backup preserves sensitive data such as passwords and health information. This means you can later restore these items without re-entering credentials.
If you’re unsure which tool to use, note that Windows users typically use iTunes for backups, while Mac users on macOS Catalina and later use Finder. For Mac users on older macOS versions, Finder isn’t available and iTunes handles the backup instead. For more on the exact steps, see Apple’s official guidance on backing up with Finder or iTunes and restoring from a computer backup. Apple’s help article provides a clear, step-by-step approach: Use the Finder, Apple Devices, or iTunes to transfer data …. If you want a broader overview of what gets backed up, Apple also explains how to back up iPhone via computer here: Back up iPhone.
Tip: keep your iPhone unlocked during the backup and avoid performing other large data transfers on the computer while the backup runs. This keeps the backup clean and complete.
Steps to back up and restore on the new iPhone
Follow these steps to ensure a smooth offline transfer from your old iPhone to the new one. The goal is a complete, encrypted copy on your computer that you can restore to the new device later.
- Back up your old iPhone to your computer with encryption enabled.
- Connect the new iPhone to the same computer using a USB cable.
- Open Finder (macOS Catalina and later) or iTunes (Windows or older macOS) and select the new iPhone.
- Choose the option to Restore Backup, then pick the encrypted backup you created on the old device.
- Let the restore finish, then complete the setup on the new iPhone. Verify that the data is present and correct.
After restoring, some apps may need you to sign in again, and certain settings might reappear as part of the restore. If you keep the same Apple ID on both devices, you’ll often see smoother transfers for items like keychains and app data. If you prefer official guidance, Apple provides detailed steps for restoring from a computer backup here: Restore your iPhone, iPad, or iPod touch from a backup.
If you run into any roadblocks, a quick retry usually fixes it. Make sure the USB cable is snug and the computer stays powered during the process. For wired transfer specifics and troubleshooting, Apple also covers a wired method here: Use a wired connection to transfer data to a new iPhone or iPad.
Pros and cons of computer transfer
Deciding between methods comes down to your priorities. Here’s a concise view of the main advantages and trade-offs of a computer-based transfer.
- Pros
- Offline transfer: Your data remains on your local device, not in the cloud.
- Fast with a good cable: A direct connection can speed up the transfer, especially for large photo libraries.
- Full data including passwords if encrypted: An encrypted backup preserves sensitive information so you don’t have to re-enter credentials.
- Cons
- Requires a computer: You need access to a PC or Mac and the appropriate backup software.
- More steps: The process involves creating a backup and then restoring it, which can take longer than wireless options.
- Cable and power requirements: A stable connection and a charged devices reduce the risk of interruptions.
If you’re weighing options, consider whether you want an offline copy for redundancy or if you prefer a hands-off approach that uses iCloud. Apple’s support articles offer a clear comparison of methods and how they stack up against Quick Start and iCloud restore. For a broader view, see Apple’s guide comparing transfer methods: Transfer data from your previous iOS or iPadOS device to a new device.
Would you like to add a quick troubleshooting box with common computer transfer hiccups and fixes, or keep this section tightly focused on the step-by-step flow?
Tips for a smooth transfer and avoiding common issues
Transferring data from your old iPhone to a new one should be straightforward, but a few well-planned steps can save you time and hassle. Use these practical tips to keep the process steady, minimize interruptions, and verify everything lands correctly on your new device. Whether you prefer Quick Start, iCloud backup, or a computer restore, these guidelines help you avoid the usual snags and ensure a clean handoff.
Prep your devices before starting
Set up for success by getting everything ready before you begin. Make sure both iPhones are updated to the latest iOS version available for your devices. This helps ensure compatibility and reduces the chance of missing features during the transfer. Charge both phones fully or keep them connected to a reliable power source throughout the process. A stable connection is crucial, especially for wireless transfers like Quick Start or iCloud restoration. Keep the devices close to each other, ideally within arm’s reach, so the transfer can happen without interruptions.
If you’re using Quick Start, enable Bluetooth and connect to Wi-Fi on both devices. This creates a smooth bridge for data to move from the old iPhone to the new one during setup. It also helps keep the setup screen responsive and reduces the likelihood of mid-transfer pauses. For guidance on the initial setup and transfer flow, see Apple’s official Quick Start resource.
- Update both devices to the latest iOS version.
- Ensure both devices are charged or plugged in.
- Keep both devices near one another during the transfer.
- Enable Wi-Fi and Bluetooth for Quick Start if you’re using that method.
For official guidance on preparing iPhone devices for transfer, you can reference Apple’s setup and transfer instructions. If you want a wired option, Apple also provides details on a wired transfer that can help when wireless traffic is a concern. See Apple’s wired transfer article for specifics: Use a wired connection to transfer data to a new iPhone or iPad.
Check storage and battery
Before starting any transfer, confirm there is enough space on the destination device and in your cloud or local storage. iCloud backups require sufficient storage in your iCloud account, and local backups on a computer or a device need enough free space to accommodate the entire data set you plan to move. If you’re using Quick Start or iCloud restore, a larger photo library or a lot of app data can extend the time the transfer takes, so choose an appropriate time window.
- Review your iCloud storage or phone storage limits.
- Free up space if needed by offloading unused apps or large media files.
- Ensure the destination iPhone has enough room for the incoming data.
- Keep the devices plugged in during the transfer to prevent any mid-transfer power loss.
If you hit storage constraints during the backup or restore process, consider temporarily storing some media on a computer or in the cloud and then re-downloading after the transfer completes. For additional context on setup and storage considerations, see official guidance on restoring from iCloud backups and managing storage on iPhone.
Apple’s guidance on managing backups and storage can be a helpful reference if you need a deeper dive into what gets stored and how to optimize space: Back up iPhone. If you run into transfer hiccups, a quick retry with sufficient space and a stable connection often resolves the issue.
Post transfer checks and security
After the transfer finishes, take a few minutes to confirm that your data has arrived intact and that your important apps and logins work as expected. Start with the essentials: messages, photos, contacts, and key apps you rely on daily. Some apps may require you to sign in again or re-authenticate two-factor authentication. It’s normal to re-enter a password or approve a login on the new device.
- Open email and messaging apps to verify conversations and attachments are present.
- Check health and fitness data if you use health apps that store data locally or in the cloud.
- Re-authenticate where needed for banking, authentication apps, and password managers.
- Review your home screen layout and organizational changes that may have occurred during the transfer.
If you notice missing items or apps that don’t open correctly, try a quick sign-out and sign-in, or re-download the app. Some data may still be syncing in the background, so give it a little time after setup to settle in. For troubleshooting steps around post-transfer issues and ensuring data integrity, consult official resources that cover common restore pitfalls and recovery steps.
Apple provides detailed steps and troubleshooting guidance for restoring data from different sources. For example, if you encounter problems during a restore, you can revisit guidance on re-authenticating apps, checking account statuses, and completing the transfer flow: Restore an iPhone, iPad, or iPod touch that needs a newer …. If you need a broad overview of all transfer methods and how they compare, Apple’s transfer guide is a reliable companion: Transfer data from your previous iOS or iPadOS device to a new device.
If you ever need to troubleshoot a wired transfer, Apple’s wired transfer article covers common issues and fixes: Use a wired connection to transfer data to a new iPhone or iPad. For wireless paths, the iCloud restore steps include helpful reminders about re-authentication and background data downloads: Restore using iCloud Backup.
A key takeaway: even after the transfer completes, give your new iPhone a few minutes of uninterrupted use to finish background syncing. This helps ensure all photos, messages, and app data arrive in their proper places and start syncing where needed.
Would you like to add a quick checklist box with the most common post-transfer checks, including specific apps and services to verify, or keep it as a concise list for quick reference?
Conclusion
Moving data to a new iPhone can be quick and reliable when you choose the method that fits your situation. Quick Start offers a fast, wireless setup that copies most of your essentials in one pass, while iCloud backup and restore provides a hands off option when devices aren’t side by side. A computer backup gives you an offline, local copy for maximum control and redundancy. For a smoother experience, keep both smartphones charged and on a stable network, then verify essential items like messages, photos, and passwords after the transfer. Regular backups are your best safeguard, so pick a routine that suits your workflow and stick with it.
What If the Only Thing Between You and the Life You Deserve Is a Hidden Wealth Code Waiting to Be Activated
>>> Open the Door <<<