Dust inside a phone camera lens can be a silent culprit behind spots, squinting glare, or duller photos. If you’ve noticed odd specks in your shots or unexpected softness, you’re not imagining it. This guide explains why dust sneaks in, how it affects image quality, and practical steps you can take without risking your device.
First, you’ll learn what to look for in your photos and how to tell if the issue is surface dust on the lens cover or dust trapped inside the lens assembly. You’ll also see why certain lighting makes dust more noticeable and when to expect flare or color shifts. With that context, you’ll be ready to choose safe at home options that won’t void your warranty or invite bigger problems.
We’ll cover kept approaches that are easy, affordable, and safe. You’ll get straight answers about cleaning the outside of the lens, avoiding liquids, and using the right tools like a microfiber cloth or camera air blower. The guide also explains when it’s time to seek professional help from the manufacturer or an authorized service center to remove internal dust without risking your warranty.
By the end, you’ll know practical, proven steps to protect photo quality. You’ll be able to decide whether a DIY clean is enough or if you should book a service appointment. This no-fluff guide aims to save you time and money while keeping your smartphone photography sharp and reliable.
What exactly is dust inside the lens and how it affects photos
Dust inside the lens is not just a surface problem. When tiny particles slip past seals and settle between lens elements or inside the housing, they interact with light in ways that surface dirt does not. This section explains how internal dust differs from exterior grime, and why a quick wipe on the outside often won’t fix the issue. Think of it like dust inside a camera’s eye versus dust on a pair of glasses. The former sits in the optical path while the latter sits on the surface. For readers curious about real-world signs, modern smartphones sometimes alert you to lens cleanliness, showing how even small particles can matter.
- Internal dust vs exterior debris
- Internal dust is trapped inside the multi-element optical stack. It can sit between the protective cover glass and the sensor, or between lens elements. You might not see it on the outer surface, but it can cast shadows, create specks, or alter light paths.
- Exterior debris sits on the lens cover. It’s what you wipe with a microfiber cloth. Cleaning the outside reduces glare and smudges but won’t remove particles that are tucked inside the housing.
- Why exterior cleaning isn’t enough: light must travel through all optical layers. If a particle sits inside, it can cast dark spots or halos that stay in photos regardless of how clean the outside looks. For more context on how dust affects lens performance, see this overview on lens cleanliness and sensor exposure considerations. Photo by Damian Kaffenberger.
- How internal dust forms
- Sudden temperature changes, moisture fluctuations, or aging seals can create micro-gaps. Tiny particles slip in with changes in pressure or when the device is opened for service.
- Even water-resistant builds aren’t fully immune. Over time, seals can degrade, allowing dust to drift into the optical path.
- Environmental factors matter: dusty environments, workspaces with sawdust, or heavy indoor particulates can increase the chance of internal contamination.
- Visual clues you’re dealing with internal dust
- If wiping the exterior leaves specks that reappear after a single shot, internal dust is likely involved.
- Dust that appears in the same spot across multiple photos or appears with specific lighting angles points to internal particles.
- Sudden changes in image clarity after exposure to dusty environments also hint at internal intrusion.
- Practical takeaway
- Treat internal dust as a more serious issue than surface smudges. Exterior cleaning is essential, but it’s not a complete solution for internal particles. If you suspect internal dust, you’ll want to assess options that won’t void warranties, such as manufacturer service or authorized repair centers. For a related discussion on how lens cleanliness features work on smartphones, you can read about lens cleaning hints in recent OS updates. Do smudges on your phone’s camera make photos look worse? on CNET.
 Photo by Damian Kaffenberger
- Quick note on professional help
- If you notice ongoing specking that worsens or changes after factory warranties expire, it’s wise to consult the manufacturer or an authorized service center. They can remove internal dust with controlled methods that preserve the camera module and seals.
- A few pointers for prevention
- Avoid opening your device yourself to clean inside. Dust entry usually stems from tiny gaps that require specialized tools to seal properly.
- When you’re in dusty environments, keep the device in a protective pocket or case with a dust barrier, and minimize exposure to heavy wind or blowing dust.
- Related resources you may find helpful
- Learn how modern iPhone and Android systems hint at lens cleanliness and how software cues can guide you to clean care steps. Learn more about lens cues and cleaning prompts from industry coverage on lens hygiene. For a practical read on dust in lens assemblies and its effects, see the articles linked here.
- External reading: see the discussion on whether exterior dust is enough to worry about and how to interpret photos with dust-related anomalies.
- If you want a broader view on how smudges affect image quality and steps to minimize their impact, check out coverage from CNET on fingerprint smudges and photo clarity.
- Quick takeaway
- External cleaning helps with glare and hazy appearances, but internal dust requires careful consideration of service options. If your photos consistently show specks or haziness that don’t go away with a wipe, you’re likely dealing with internal dust.
- Related links for deeper reading
- Do smudges on your phone’s camera make photos look worse? — CNET
- Your iPhone finally knows when its camera is dirty — GadgetHacks
- 📸 There are spots on the iPhone camera – what to do? — Rud Service
- Understanding camera sensor and lens spots — Charlotte Bellamy
- Practical image note
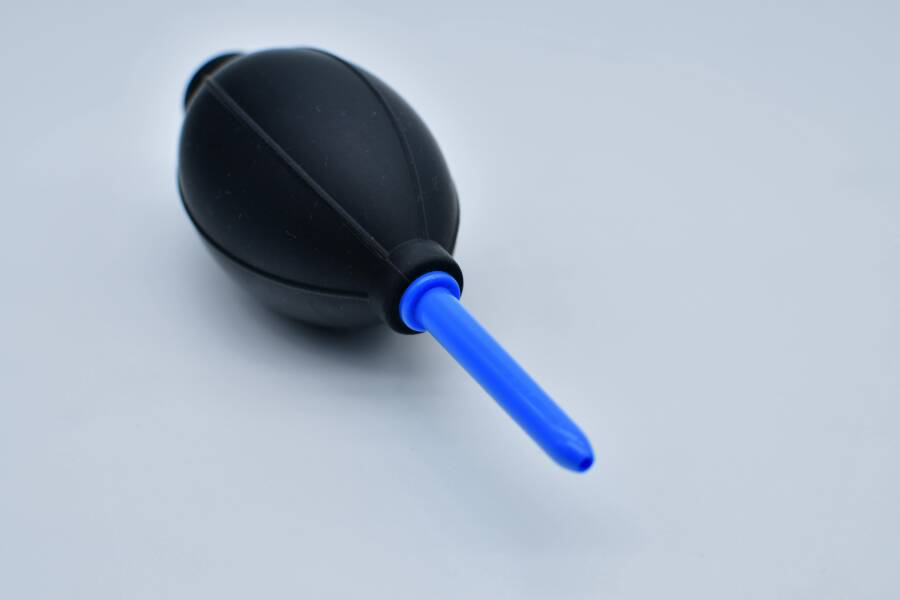
- The image above demonstrates a safe method for exterior cleaning, using a compact air blower to remove loose dust from the lens surface before assessing interior issues.
- Final thought
- If you’re unsure whether the dust is internal, start with a careful exterior clean and inspect images under different lighting. If specks persist, consider contacting support or visiting an authorized service provider. A cautious, methodical approach protects your warranty and keeps your photos sharp.
- Quick test you can perform at home
- Take a shot with a plain white background at a small aperture (high f-number). If you notice tiny dark specks that move with the camera angle, you may be looking at internal dust rather than surface grime. If the specks disappear when you wipe the exterior, they were surface-based. For more on how to interpret dust in images, see the external resources above.
Safe, practical steps you can take at home without opening the phone
Dust in a camera lens can quietly ruin a photo, especially in bright light or high-contrast scenes. The goal here is to address surface issues safely while avoiding actions that could harm the device or void a warranty. Follow these practical steps to clean the exterior lens and reduce the impact of dust without ever opening your phone. Think of it as a gentle tune-up for your camera setup, not a full teardown.
Check the exterior lens and housing
Inspect the outer glass for smudges, fingerprints, or loose dirt before you take any action. Look for streaks that appear when you tilt the device in light and check if the dirt wipes away easily with a dry cloth. If you see minor debris on the surface, a careful exterior clean may improve the shot. If the issue persists after cleaning, that’s a sign the dust may be inside the housing and needs professional attention. For context on what to look for, consider how exterior dust differs from internal particles and how lighting can reveal it. This will help you decide when to seek service rather than DIY. If you want a quick visual guide, see how others describe exterior lens cues in reliable photography resources.
Clean the exterior lens safely
Start with a clean, microfiber cloth. Lightly rub the glass in a circular motion, using only gentle pressure. If you need a bit more grip, dampen the cloth slightly with a safe cleaning solution designed for electronics, but apply the liquid to the cloth, not directly to the lens. Avoid abrasive cloths or paper towels that can scratch the coating. Wipe the entire surface, including the edges where fingerprints tend to collect. After cleaning, inspect the lens again under bright light and take a test shot to confirm improvement. If you notice remaining smudges or streaks, repeat once more with a fresh section of the microfiber. This method keeps the process safe for both your camera and your wallet.
Use compressed air around the edges safely
If there are stubborn specks near the edge of the camera housing, try short bursts of compressed air around the perimeter. Hold the can upright and keep a short distance from the lens to avoid blowing dust toward the glass. Avoid spraying directly into the lens itself. Use slow, even bursts and pause between sprays to let any dust settle. This technique helps remove loose particles from the housing without direct contact with the lens surface. If you notice the specks shift with angle, you may be dealing with surface dust; continue with careful exterior cleaning as needed.
What not to do during DIY cleaning
Avoid liquids on the lens beyond a dampened cloth, and never spray cleaner directly onto the glass. Do not tap or shake the device, which can drive dust deeper into the housing. Do not insert tools or sharps into the gaps around the camera module. Maintaining the integrity of seals is crucial, and improper cleaning can void warranties. If you’re concerned about warranty impact, check the manufacturer’s guidelines or contact an authorized service center before attempting internal cleaning. For most users, exterior care and professional service when needed are the safest paths. If you’re unsure about warranty terms, explore official support articles from the brand.
External resources you may find helpful:
- How to clean a camera lens without a kit from reputable photography outlets
- Step-by-step lens care tips and manufacturer recommendations
Quick takeaway: keeping the exterior clean helps, but internal dust needs professional attention. If specks persist after a careful exterior clean, consider official service options to protect your device. For more on interpreting dust in photos, you can read trusted guides linked in the resources above.
When to seek professional help and what to expect
Dust and moisture in a phone camera can start small but quickly become a bigger issue. Knowing when DIY care ends and professional service begins helps protect image quality and your device. In this section, you’ll learn the telltale signs that internal dust is the culprit, what a typical repair path looks like, and what you should expect in terms of cost and warranty.
Recognizing when DIY isn’t enough
If you notice persistent specks that reappear after a wipe, or if fogging and moisture show up in different lighting, those are strong cues that the problem may be internal. Error readings in the camera app or sudden drops in clarity across multiple shots also point to a deeper issue beyond surface dust. In these cases, DIY exterior cleaning won’t fix the root cause, and you should seek help from the manufacturer or an authorized service center to avoid risking the seal or sensor. For context on moisture and condensation scenarios, see discussions about how condensation can affect camera lenses. https://discussions.apple.com/thread/254999520
What a professional repair typically includes
A professional repair usually begins with a diagnostic assessment to confirm internal dust or moisture. The core steps often involve replacing the camera module or lens assembly, inspecting and resealing the camera housing, and running comprehensive tests to verify focus, exposure, and image quality. Technicians will check for any seal degradation that could invite future dust ingress and may replace gaskets or o-rings if needed. The final phase includes test shots under varied lighting to ensure the issue is resolved. For readers curious about the repair process, see resources detailing camera repair secrets and advanced techniques. https://sydneycbd.repair/beyond-the-screen-phone-camera-repair-secrets/
Costs, warranties, and service options
Costs vary by model and region, but expect to pay for parts, labor, and potential diagnostic fees. Typical ranges for camera module or lens replacement fall into the low hundreds, depending on whether OEM parts are used and whether the device is still under warranty. Warranty coverage can influence your choice between OEM parts and reputable third party options. Many manufacturers and authorized centers offer warranty-compatible repairs, which helps protect you from out-of-pocket costs if the issue recurs. When evaluating service, consider the trade-off between price, reliability, and the long-term performance of your camera. For guidance on parts quality and warranty considerations, see discussions comparing genuine versus non-genuine parts. https://www.ptc.net.au/blog/the-impact-of-using-non-genuine-parts-for-phone-repairs/
Preventing dust and keeping your camera clean
Keeping your camera clean starts with smart habits and a protective setup. This section covers practical steps to minimize dust intrusion and maintain clear, sharp photos. Think of it as a quick, repeatable routine you can perform every day to protect your optical system and get the best from your smartphone camera.
Daily care tips
Create a simple daily routine that minimizes fingerprints and stray dust. After outdoor use, wipe the lens gently with a clean, microfiber cloth to remove surface grime. Avoid touching the lens with your fingers, and store the phone in a clean pocket or case when you’re on the go. If you notice a smear, a light, circular wipe is usually enough. For ongoing guidance on keeping lenses clean, you can explore practical tips from trusted photography resources.
Storage and environment tips
Where you store your device matters as much as how you handle it. Keep the phone in a clean, dry place away from dusty bags or drawers filled with sawdust or powders. Use a case with camera protection or a cover when the phone is not in use, especially in dusty environments like workshops or beaches. If you travel, consider a soft pouch that shields the camera from grit and wind. For more on protecting the lens during daily life, see practical protection guides from reputable outlets like How to Protect Your Phone Camera Lens.
Protective accessories and routines
Invest in simple, effective accessories that reduce dust exposure and support easy maintenance. A thin camera lens protector or a dedicated camera cover can guard against scratches and direct dust intrusion when you’re not shooting. Pair these with a regular cleaning routine using a microfiber cloth and a brief blast of air from a camera blower if needed. Gentle cleaning once a week helps keep coatings intact and reduces the chance of abrasive buildup. For additional reading on choosing protective gear, consider reputable guides such as How to Clean Your Phone’s Camera in Four Ways and related lens protection tips.
Conclusion
Dust inside a camera lens can be tough to wipe away. Start with exterior cleaning using a microfiber cloth, a gentle circular motion, and tiny bursts of compressed air around the edges if needed. If the specks stay or reappear in photos, the issue may be internal and require professional help. Exterior care is safe and inexpensive, but internal dust usually calls for authorized service to avoid damaging seals or the sensor.
Know when to seek help: persistent specks that show up under varied lighting or after a wipe, fogging, or changes in image clarity across many shots all point to internal contamination. In those cases, book an appointment with the manufacturer’s service center or an authorized repair partner. Costs vary by model and warranty status, but options exist to protect your investment through official channels.
A practical takeaway: keep your smartphone protected, clean the exterior regularly, and reserve internal cleaning for qualified technicians. By staying proactive, you’ll preserve image quality and extend the life of your camera system. If you’ve found this guide useful, share your experiences or questions below to help others troubleshoot with confidence.