Window film can add daytime privacy, soften glare, or limit solar heat, but one film rarely does all three equally.
Start with the room’s main problem, check the film label against your window glass, then choose a finish whose appearance works both inside and outside.
A reflective film is not a nighttime privacy screen: when a room is brighter than outdoors, the view can reverse.
Match the film to the problem at the window
Decorative and frosted films blur a view while letting light through; they suit a bathroom sidelight or a street-facing pane where seeing out is less important.
Reflective solar-control films keep a clearer view in daylight and reduce glare or solar heat, but their mirror effect depends on which side is brighter.
Clear solar films prioritize a less noticeable appearance, so they may not create the visual barrier you want.
Think about the window at the hours you use the room.
For a living room that gets afternoon sun, compare visible light transmission (VLT), reflectivity, and the manufacturer’s heat-rejection data.
VLT describes how much visible light passes through; a lower figure means a darker view.
The official product page distinguishes a clear finish from a solar privacy finish and describes the latter as daytime privacy.
Treat each performance percentage as product-specific, not a promise for every pane.

Daytime privacy changes after sunset
One-way reflective film relies on brighter light on the reflective side.
During the day, outdoor brightness can make the glass look mirrored from outside; at night, an illuminated room can be easier to see from outdoors.
The official guidance describes solar privacy as a daytime benefit.
It also explains that a reflective finish can look mirrored from indoors at night.
Use curtains or blinds when you need privacy after dark.
Frosted or patterned film works differently: it obscures detail regardless of which side is brighter, although it also limits a clear view through the treated area.
For a window where you want privacy around the clock, compare that tradeoff before choosing a reflective finish.
Do not assume a “one-way” label means one-way visibility in every lighting condition.
Check the glass before measuring
Read the exact product instructions before opening the roll.
Glass construction and film chemistry affect which combinations are allowed.
For example, the official residential instructions permit their sun-control films on clear single- or double-pane glass.
They exclude wired, textured, patterned, triple-pane, and visibly damaged glass.
Those limits apply to that product family; another film can have different rules.
Inspect the whole pane for cracks, chips, existing film, internal blinds, or unusual coatings.
If you cannot identify the glass type, ask the window maker or film manufacturer with the window label and product information in hand.
Sun exposure, pane size, glazing, and nearby shading can affect how a film-and-glass combination behaves.
Follow the film maker’s compatibility chart, and check whether applying film affects the window warranty.
Measure the visible glass area, not the frame opening.
Record width and height at several points if the pane is not square, then use the largest measurement and allow the edge clearance stated in the installation guide.
Plan each pane separately; a narrow sidelight and a broad picture window may need different widths or a different product choice.
Make a quick room note before shopping: when the sun reaches the pane, where people sit, whether the room needs a view outside, and when privacy matters.
A sunny desk may call for glare control while a bathroom sidelight needs obscured detail.
Solving the main complaint first keeps the finish choice tied to how the room is used.
Compare product labels line by line.
Look for the intended surface, glass types allowed, care directions, and whether the film is removable.
For solar-control options, compare visible light transmission and heat data on the same basis.
A darker appearance can change the room’s daylight, so consider the view from a seat and from the approach outside.
Check a sample against the actual window if one is available.
View it in morning light, afternoon sun, and after the room lights come on.
A finish that looks subtle on a small sample can feel more prominent across a large pane.
Check the color from both sides, since a reflective surface can look different indoors and outdoors.
Plan privacy by room activity.
A lower pane beside a walkway may need a frosted band, while the upper portion can stay clear for daylight.
A bedroom that faces a neighboring window may need a blind at night even with daytime reflective film.
Consider how doors, lamps, and mirrors affect sightlines after dark.
Before cutting, clear a work area where the film can stay clean and flat.
Put towels within reach, keep pets and fans away from the glass, and have a second person help with a wide sheet if the maker recommends it.
Set out the tools first so wet film is not left waiting while you search for a blade or cloth.
Work on one pane at a time and keep the remaining material covered.
If a speck appears under the film, pause and lift the edge while the surface is still wet, if the product instructions allow repositioning.
Do not drag grit across the glass.
Gentle, even squeegee passes help move trapped solution toward an open edge.
After application, note which room and pane received each product and keep any offcuts with the packaging.
That record helps identify the film later if you need cleaning guidance, warranty help, or removal instructions.
If several windows have different coatings or exposure, label them separately rather than assuming one product choice fits the whole home.
Lay out a clean, wet installation
Set out a spray bottle, the solution specified by the manufacturer, a lint-free cloth, a sharp trimming blade, and a squeegee.
Cover the sill and nearby flooring.
Clean the glass carefully because a grain of grit trapped beneath the film can remain visible.
The official instructions call for microfiber cleaning and allow a razor for stubborn residue on suitable glass.
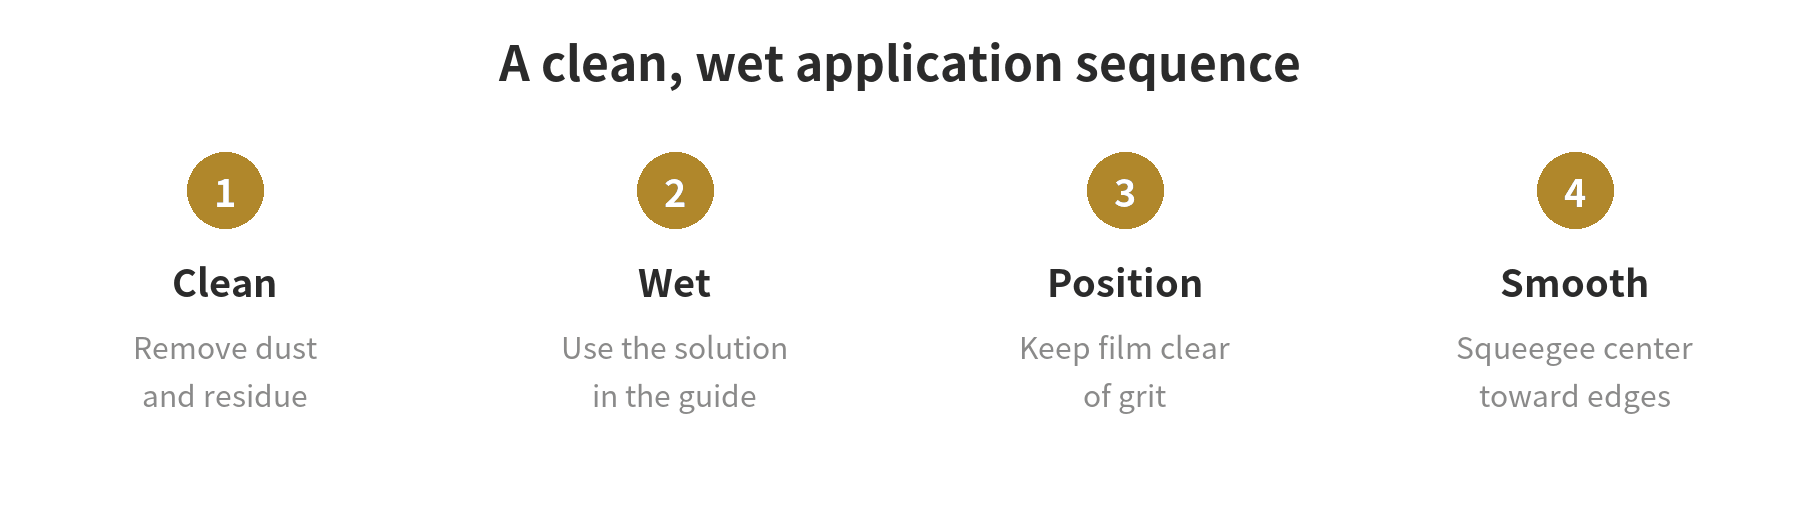
- Cut the film slightly larger than the glass if the instructions call for trimming after placement.
- Wet the glass and film as directed. Separate the release liner without letting the adhesive or cling surface touch dust.
- Position the film, then squeegee from the center toward the edges to move solution and air outward.
- Trim the edge with a sharp blade and wipe away remaining water. Avoid pressing the blade against the frame or seal.
Follow the product’s own solution and trimming directions; static-cling film and adhesive-backed film may not use the same method.
Work out of direct sun when the manufacturer advises it, since fast drying can make positioning and smoothing harder.
Do not install over dirt, condensation, or damaged glass.
Give the film time and protect its warranty
Small water pockets or a hazy appearance can be part of drying, but the cure period depends on the film and conditions.
The official guidance says its sun-control films take around 30 days to fully cure; do not transfer that timing to another product.
Follow the package directions for when to clean the surface and which cleaner to use.
Keep the receipt, packaging, product name, and installation instructions together.
Warranty terms can distinguish film defects from glass breakage, installation mistakes, or damage caused by cleaners.
The current consumer warranty, effective April 1, 2026, limits thermal-shock glass coverage to recommended glass types and sets a maximum of $500 per window.
That term belongs to this specific product warranty.
Read the full warranty for reporting requirements and exclusions before installation.
For a rental, historic window, specially coated insulated glass unit, or transferable warranty, get written compatibility guidance first.
Apply film after the window maker confirms it is suitable.
Removing film later may leave adhesive residue or require careful scraping, so the glass and coating instructions matter at removal too.
Frequently Asked Questions
Can window film go on the outside of the glass?
Only if the exact film is designed for exterior application.
Many residential DIY films are specified for the interior surface; check the installation guide for the placement side before cutting.
Can I use window film on a bathroom window?
Yes, if the pane is compatible with that film.
A frosted design obscures the view more consistently than reflective film, while a clear view through the window is reduced.
How do I remove film that is already installed?
Check the film maker’s removal instructions first.
Some films can be peeled slowly from a lifted corner, while adhesive residue may need a glass-safe cleaner and scraper; avoid scratching coatings or seals.
Does window film make glass shatterproof?
No.
Solar-control film is not safety glazing.
The official guidance says its sun-control films are not safety films and do not make glass burglar-proof or storm-proof.
Last updated: 2026-10